
Head wraps are a staple in fashion and hair care routines for many African women and women of African descent.
Head wraps are versatile, come in rich, vibrant colors and intricate patterns, and have a deep cultural significance and history.
Wearing head wraps is a centuries-old tradition in many regions of Africa.
Historically, these wraps were worn for a multitude of reasons, from signifying a woman's marital status to denoting social standing within the community.
In modern times, head wraps have transcended their traditional roots to become a global fashion statement embraced by women of all backgrounds.
In this article, you’ll explore 13 quick and easy head wrap styles for natural hair that will enhance your appearance and bring your wrapping game to the next level.
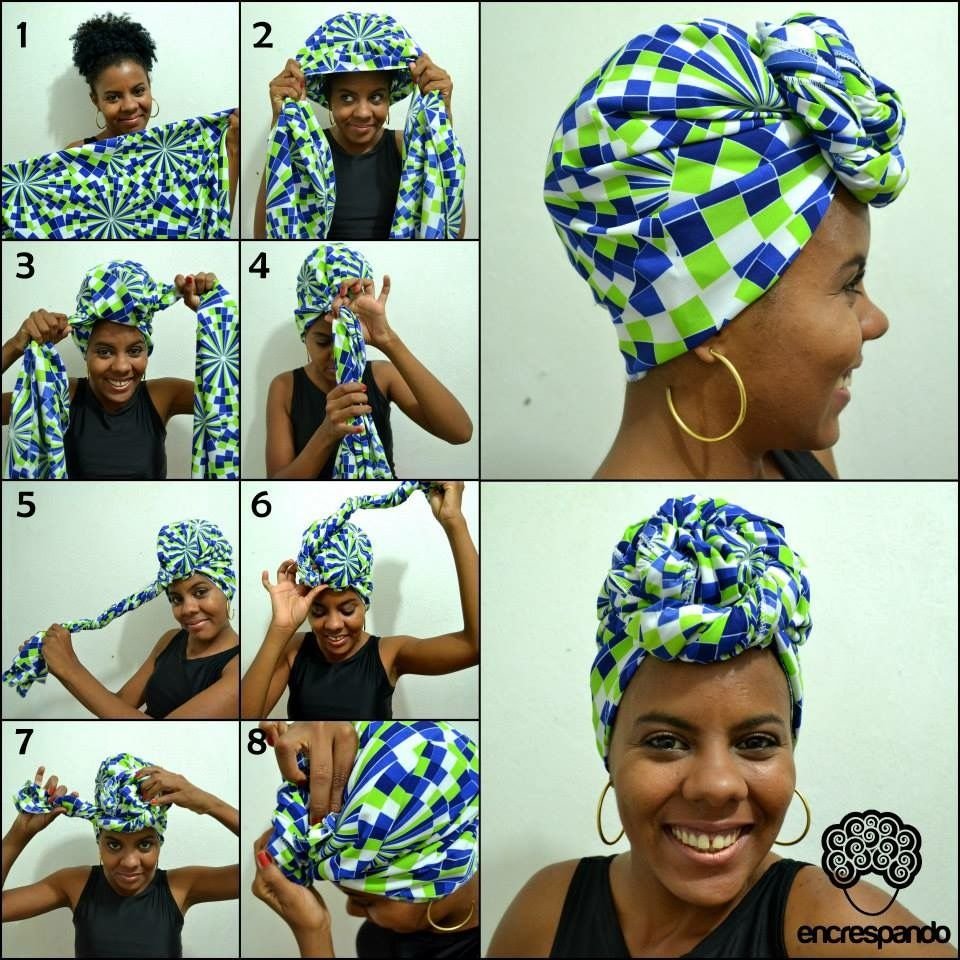
(1) The Classic Turban
The Classic Turban is an elegant head wrap. Its rich history spans ancient civilizations in the Middle East, South Asia, and Africa.
Worn for practical and cultural reasons, it symbolizes status, spirituality, and identity.
Today, the turban is a famous fashion statement recognized globally for its sophisticated and regal appearance.

HOW TO CREATE THE CLASSIC TURBAN
You'll need a rectangular scarf.
Hold the scarf horizontally and place the center at the back of your head. Bring the ends to the front and cross them over your forehead.
Twist the ends around each other once or twice, then wrap them back over your head, crossing at the back. Continue wrapping until the ends are used up.
Tuck the loose ends into the folds of the wrap to secure. Adjust the wrap to make sure it’s snug and even.
Here’s Why you’ll love THE CLASSIC TURBAN
The Classic Turban is perfect for formal events like weddings and galas but also great for casual outings.
It’s suitable for long, short, curly, or coily hair.
It protects your hair, maintains moisture, and prevents breakage.
(2) The High Bun Wrap
The High Bun Wrap is a popular choice. It’s elegant and practical.
HOW TO CREATE THE HIGH BUN WRAP
Gather your hair into a high bun at the top of your head. Secure it with a hair tie.
Take a rectangular scarf and place the middle at the back of your head. The scarf should be equal in length on both sides.
Bring the ends of the scarf to the front of your head, crossing them over your forehead.
Twist the ends around each other to create a rope-like effect.
Take the twisted ends and wrap them around the base of your bun.
Tuck the ends of the scarf into the folds at the back of your head to secure them in place. Use bobby pins if necessary. Ensure the wrap is snug but not too tight.

PHOTO CREDIT: LAIANA MATOS VIA PINTEREST
Here’s Why you’ll love THE HIGH BUN WRAP
You’ll appreciate the High Bun Wrap’s elegant and polished appearance. It’s suitable for both casual and formal occasions.
The high bun adds height and enhances your facial features.
It’s simple to create and a quick solution when you have a busy morning or are short on time.
The High Bun Wrap is favored for elevating any outfit and for its practicality in managing and protecting natural hair.
(3) The Erykah Badu Inspired Wrap
Erykah Badu, an iconic figure in music and fashion, is known for her bold and artistic head wrap styles.
Her distinctive styles often feature tall, elaborate wraps that make a powerful fashion statement and celebrate African heritage and individuality.
HOW TO CREATE The Erykah Badu Inspired Wrap
If your hair is long, tie it into a high bun or use a wig cap to create a smooth base.
Use a large, stiff African headwrap like an African wax print fabric. Fold the fabric in half lengthwise.
Position the center of the folded wrap at the back of your head and bring the ends to the front.
Twist the ends tightly together at the front of your head. Lift the twisted ends upwards, creating more height.
Wrap the twisted fabric around the top of your head. Add layers to achieve the desired height and boldness. Tuck the loose ends into the folds to secure the wrap in place.
Here’s Why you’ll love The Erykah Badu Inspired Wrap
The Erykah Badu Inspired Wrap is a striking fashion statement with deep cultural significance.
It celebrates African heritage, paying homage to traditional headwrap styles worn by African women for centuries.
This wrap can elevate your style by adding a unique and powerful element to your look.
(4) The Front Bun Wrap
The Front Bun Wrap is an elegant and sophisticated head wrap style where the bun is positioned at the front of your head.
This style accentuates grace and can enhance any outfit. It’s ideal for formal events and special occasions.
The bun at the front adds a unique and eye-catching element to your overall look, creating a regal and polished appearance.
HOW TO CREATE THE FRONT BUN WRAP
If your hair is long, tie it into a low bun or ponytail to create a smooth base.
Use a long, rectangular scarf. Place the center of the scarf at the back of your head and bring the ends to the front.
Cross the ends over your forehead and twist them together tightly.
Wrap the twisted ends into a bun at the front of your head. Ensure the bun is secure and the twists are tight enough to hold the shape.
Tuck the loose ends into the folds of the wrap or secure them in place with bobby pins. Adjust the bun to ensure it is even and centered.
VIA PINTEREST - FRONT BUN WRAP VARIATION
Here’s Why you’ll LOVE THE FRONT BUN WRAP
The Front Bun Wrap suits special occasions such as weddings, galas, and cultural celebrations.
Its elegant look complements formal attire, adding a touch of sophistication and uniqueness.
The style highlights your features and stands out as a statement piece. It’s perfect for attending events where you want to make an impression.
(5) The Pineapple Style wrap
The Pineapple Style Wrap is a favorite among women with curly and coily hair textures. It helps retain moisture and reduces breakage.
It protects curls while maintaining their definition and prevents curls from getting flattened or frizzy overnight.
This style keeps your curls intact and is a great way to extend the life of your wash day.

Via Pinterest — ItsZeenaEdwards
HOW TO CREATE THE PINEAPPLE STYLE WRAP
Ensure your hair is dry and detangled. To maintain hydration, apply a leave-in conditioner or a light moisturizer.
Gently gather all your hair into a high ponytail at the top of your head. Use a soft, snag-free hair tie to secure it without pulling too tightly.
Take a large, rectangular head scarf and fold it into a triangle. Place the middle of the scarf at the back of your head, bringing the two ends to the front.
Tie the ends of the scarf into a knot at the front of your head, just above your forehead.
Take the loose ends of the scarf and wrap them around the base of the ponytail, then tie them securely or tuck them into the scarf to keep everything in place.
Here’s Why you’ll love THE PINEAPPLE STYLE WRAP
The Pineapple Style Wrap is highly effective as a protective hairstyle for overnight use.
Keeping your hair on top of your head prevents curls from being crushed against your pillow, which helps maintain your style’s shape and definition.
Additionally, wrapping your hair with a head scarf made of satin or silk reduces friction, which minimizes frizz and breakage.
This method ensures you wake up with well-preserved curls requiring minimal restyling.
(6) The Top Knot WRAP
The Top Knot Wrap is a chic, simple style for any hair length.
This style is quick to achieve and adds a touch of elegance to your look.
HOW TO CREATE THE TOP KNOT WRAP
Gather your hair into a high ponytail or bun at the top of your head. Use a hair tie to secure it in place.
Take a long, rectangular piece of fabric and place the center at the back of your head. Bring the ends to the front.
Cross the ends over your forehead and twist them together tightly.
Take the twisted ends and wrap them around the base of your bun, creating a knot.
Tuck the loose ends into the folds of the wrap to secure them. Adjust the fabric to ensure it covers the bun evenly and is snug.
Here’s Why you’ll love THE TOP KNOT WRAP
The Top Knot Wrap is versatile.
It’s a stylish and practical option for all hair lengths and textures.
If you have long hair, it helps keep your hair off your neck and out of the way, giving you a clean and sophisticated appearance.
If you have short hair, the top knot adds volume and interest to your look without needing extra styling.
(7) The Layered Wrap
The Layered Wrap is a sophisticated and elegant head wrap style that layers multiple folds of fabric around your head.
This style adds depth and texture to the wrap.
It is a striking and fashionable choice for special occasions.
HOW TO CREATE THE LAYERED WRAP
Style your hair as desired. You can leave it down, tie it in a low bun, or use a wig cap for a smooth base.
Take a long, rectangular scarf and place the middle at the back of your head, with equal lengths on both sides.
Bring the ends of the scarf to the front of your head, crossing them over your forehead.
Create the first layer by folding one end of the scarf back over your head, creating a smooth, even layer.
Take the other end of the scarf and fold it back over your head, slightly overlapping the first layer.
Continue this process, alternating sides and creating multiple layers of fabric around your head.
Once you have created the desired number of layers, tuck the loose ends into the wrap folds to secure them. If necessary, use bobby pins for additional security.
Ensure the wrap is snug and even and the layers are smooth and well-positioned.
Here’s Why you’ll like THE LAYERED WRAP
The Layered Wrap is elegant, sophisticated, and perfect for formal events and special occasions.
The layered fabric adds depth and texture, creating a striking and memorable look.
(8) The Low Bun Wrap
The Low Bun Wrap is a simple and stylish head wrap style with a low bun at the nape of the neck.
Known for its understated elegance and ease of creation.
It’s a perfect choice for both casual and formal occasions.
how to create the low bun wrap
Start by gathering your hair into a low bun at the nape of your neck. Secure it with a hair tie.
Take a long, rectangular scarf and place the middle at the back of your head, with equal lengths on both sides.
Bring the ends of the scarf to the front, crossing them over your forehead.
Twist the ends together and bring them back to the nape of your neck. Wrap the twisted ends around the base of your bun.
Tuck the loose ends into the scarf folds around the bun to secure it. Ensure the wrap is snug but comfortable.
Here’s Why you’ll love the low bun wrap
The Low Bun Wrap protects your hair from environmental damage and reduces friction.
It prevents breakage and split ends.
Keeping the hair tucked away helps maintain moisture levels and protects your hair follicles, promoting overall hair health.
It is particularly beneficial for natural and curly hair, minimizing manipulation and stress on the hair.
(9) The Wrap with a Bow
Adding a bow to your head wrap is a cute and versatile style. It can be dressed up or down for any occasion.
This style works well with different colors and fabrics, including satin and silk scarves.
The Wrap with a Bow is a charming and playful head wrap style with a bow tied at the front of the crown.
The bow is a focal point that adds a whimsical element to the head wrap.
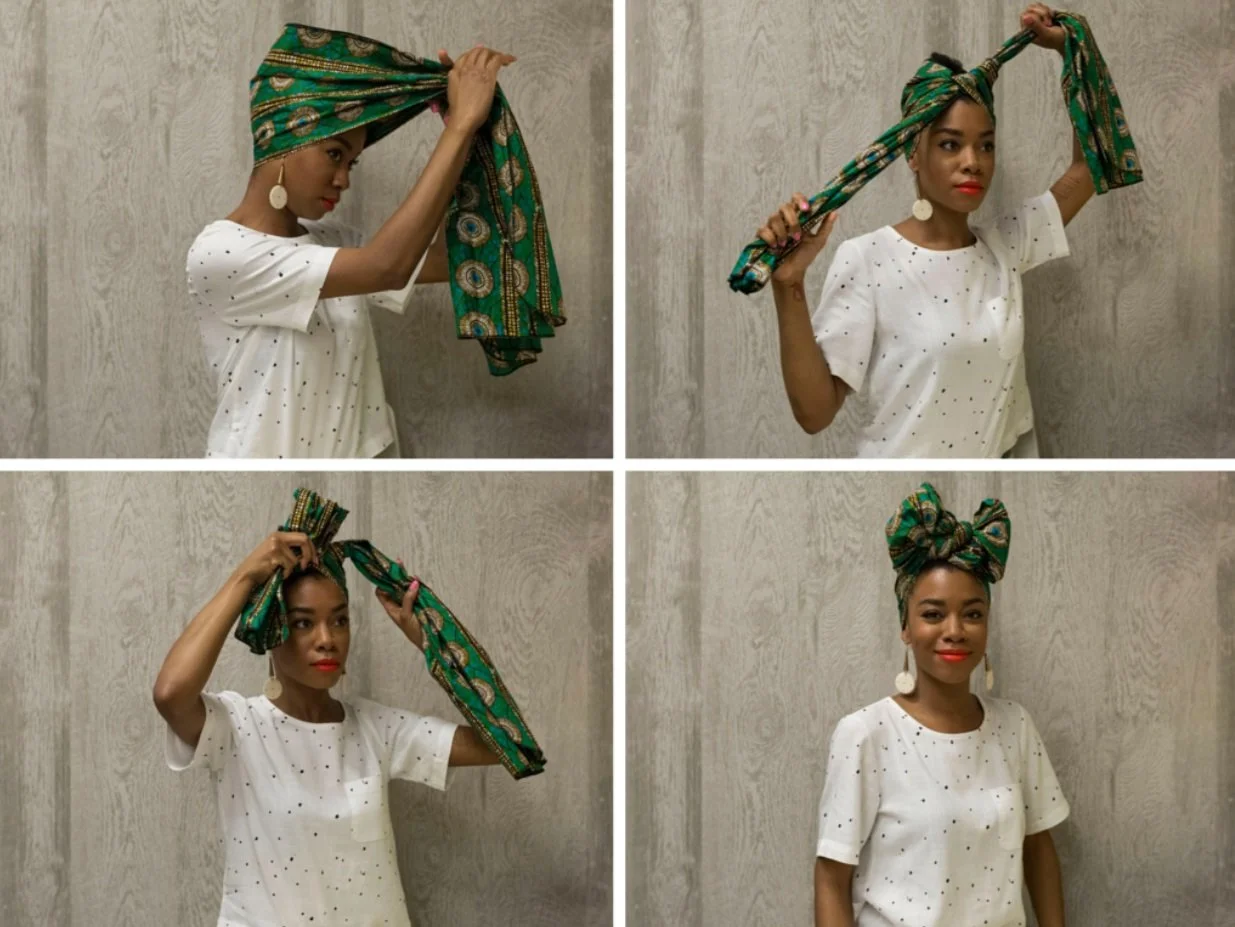
HOW TO CREATE THE WRAP WITH A BOW
Style your hair as desired. You can leave it down, tie it in a low bun, or use a wig cap to create a smooth base.
Take a long, rectangular scarf and place the middle at the back of your head, with equal lengths on both sides.
Bring the ends of the scarf to the front of your head, just above your forehead, and tie the ends into a single knot at the front of your crown.
Form two loops (one at each end of the scarf) to create the bow, which resembles bunny ears.
Cross one loop over the other and pull it through the hole created by the crossing loops, forming a bow.
Adjust the size of the bow and the tightness of the knot to your liking. Tuck in any loose ends or secure them with bobby pins if necessary.
Here’s Why you’ll love THE WRAP WITH A BOW
The Wrap with a Bow is highly versatile and can be styled with various colors and fabrics to match different outfits and occasions.
Satin and silk scarves are particularly popular choices. They add a touch of elegance and shine to your look.
Additionally, these fabrics are gentle on the hair, reducing friction and helping to maintain moisture.

WRAP WITH A BOW via Pinterest (TheWrap.Life)
(10) The twisted CROWN Wrap
The Twisted Crown is a stylish and protective style for all hair types.
This style protects your hair and adds a unique twist to your look.

HOW TO CREATE THE TWISTED CROWN WRAP
Start with your hair styled as desired. You can leave it down, tie it in a low bun, or use a wig cap for a smooth base.
Take a long, rectangular scarf and place the middle at the back of your head, with equal lengths on both sides.
Starting from the base of your head, tie the ends of the scarf.
Twist the ends around each other to create one long twisted rope. This motion should be tight enough to hold its shape but not too tight to cause discomfort.
Once the entire length of the scarf is twisted, bring the twisted section back over your head, following your hairline.
To secure the loose ends of the twist, tuck them into the wrap folds. For additional security, use bobby pins or clips.
Adjust the wrap to ensure it’s snug and even, ensuring the twist is well-positioned and the scarf covers your hair completely.
Here’s Why you’ll love THE TWISTED CROWN WRAP
The Twisted Crown Wrap adds volume.
It's an excellent option for short or long hair.
For longer hair, this twisted wrap helps keep hair off the neck and tamed, providing a neat and polished look.
The wrap gives excellent protection and helps maintain moisture and reduce friction.

(11) The TWISTED HALO Wrap
The Twisted Halo Wrap is a regal and sophisticated style perfect for formal events.
This style adds a touch of elegance and celebrates African heritage.
HOW TO CREATE THE TWISTED HALO WRAP
Style your hair as desired. You can leave it down, tie it in a low bun, or use a wig cap for a smooth base.
Take a long, rectangular scarf and place the middle at the back of your head, with equal lengths on both sides.
Bring the ends of the scarf to the back of your head and tie them into a knot.
Twist the loose ends of the scarf tightly to create two long, twisted ropes.
Lift the twisted ends and wrap them around the top of your head in a circular motion, following your hairline to form a halo.
Once you have wrapped the twisted ends around your head, depending on the length, you can twist them together once or twice at the front, then tuck the loose ends into the folds of the wrap at the sides and back of your head.
Use bobby pins if necessary to keep the halo in place. Ensure the wrap is snug and the halo is evenly positioned around your head.
Here’s Why you’ll LOVE the TWISTED HALO WRAP
The Halo Wrap is a majestic and elegant style that creates a halo-like effect around your head.
The Twisted Halo Wrap is perfect for making a bold and beautiful statement.
It is especially suitable for formal events, cultural celebrations, and occasions where you want to make a striking impression.
It adds a touch of grandeur to any look.

(12) The GELE Wrap
The Gele Wrap is a traditional Nigerian head wrap known for its elaborate and structured appearance. Gele is pronounced “gay-lay.”
It signifies elegance, status, and cultural pride.
Made from stiff, ornate fabric such as aso-oke or brocade, the Gele is worn for special occasions like weddings, festivals, and ceremonies.
HOW TO CREATE THE GELE WRAP
Though the Gele Wrap may not appear to be a quick and straightforward style, you’ll be amazed at what you can accomplish once you understand its structure. And put in some practice time.
To recreate the Gele Wrap, view the video: “How to Tie Fan Gele on Yourself - Gele Styles - Gele Tutorial” and read the following instructions.
[There is also a simpler version below.]
STEP-BY-STEP INSTRUCTIONS FOR THE GELE WRAP
Prepare Your Hair:
Style your hair into a low bun or ponytail to create a smooth base. If your hair is short, brush it back or use a wig cap to keep it flat.
Position the Gele:
Start by folding the gele fabric into a width about half its original size. Place the center of the folded gele at the back of your head, ensuring one of the ends is shorter.
Create the First Pleat:
Hold the gele firmly on both sides and create the first pleat by folding the fabric at your forehead.
Pinch a small section of the fabric and fold it inward, creating a crisp line. Secure this pleat in place with your hand.
Continue Pleating:
With your fingers, continue to create more pleats by folding the fabric inward, one pleat at a time, moving from one side of your forehead to the other.
Make sure each pleat overlaps the previous one slightly.
Work your way across your forehead, ensuring the pleats are even and neat.
Use your fingers to smooth and adjust the pleats as you go.
Secure the First Side:
Once you’ve created enough pleats at the front, take one end of the gele (preferably the shorter side) and pull it tightly across the back of your head.
Tuck this end under the opposite side of the fabric, near your ear, and secure it with pins if necessary.
Wrap the Remaining Fabric:
Bring the longer side of the gele over the top of your head, covering the pleats you just created. As you bring it around, continue to form pleats similarly, folding and adjusting to keep them even.
Cross and Tuck:
Once you’ve brought the longer side of the gele to the back of your head, cross it over the shorter side already tucked in.
Pull it tightly to ensure it stays in place, and tuck the remaining fabric securely under the folds at the back of your head.
Final Adjustments:
Adjust the gele so that it fits snugly but comfortably around your head. You may need to reposition some pleats or smooth out the fabric.
Ensure the gele is secure and the pleats are neat and well-defined.
Secure the Pleats:
If you want extra security, you can use pins to hold the pleats in place. Carefully insert pins into the pleats at the sides or back of your head, making sure they are not visible.
Finishing Touches:
Stand in front of a mirror and do a final check of the gele. Make sure it’s symmetrical and that the pleats are neatly arranged. Adjust any loose sections as needed.
Tips for Wrapping a Pleated Gele
Practice Makes Perfect: Wrapping a gele, especially with pleats, can take some practice. Don’t be discouraged if it takes a few tries to get it right.
Mirror: To help you see the back of your head, use a large mirror or two mirrors positioned at different angles.
Pins: Keep pins handy for securing the gele as you go, especially if you’re wrapping it yourself.
With these steps, you can confidently wrap a pleated gele, achieving an elegant and traditional look. The more you practice, the easier it will become, and soon you'll be able to wrap your gele quickly and effortlessly for any occasion.
HERE’S WHY YOU’LL LOVE THE GELE WRAP
The Gele Wrap is especially suitable for formal events and cultural celebrations.
It’s great for any occasion you want to make a grand and elegant statement.
Beautiful. Stunning. Structured.
It complements traditional and formal attire.

GELE HEAD WRAP
How To Do Simple But Elegant Gele With No stress
(13) The DOEK Wrap
The Doek Wrap, also known as Duku or Dhuku, is a head wrap worn by women in Ghana and other parts of West Africa. Doek is pronounced “duke.”
Unlike the often stiff and structured gele, the doek is typically made from softer fabrics like cotton or wax print fabric, making it easier to tie and wear in various styles.
HOW TO CREATE THE DOEK WRAP
Style your hair smooth or braided close to the scalp.
The doek is placed at the back of your head and is of equal length on both sides.
The ends are brought to the front or side and tied into a knot.
The loose ends can be tucked in or arranged into various styles, such as a bow, rosette, or turban-like folds.
Here’s Why you’ll love THE DOEK WRAP
The Doek Wrap is an incredibly quick and easy style.
While it is also worn at special events, it is more commonly used in everyday life.
Great for casual outings, family gatherings, and market days.
As you explore the world of head wraps, experiment with different styles and fabrics to discover the perfect look that complements your unique personality and lifestyle.


Customizing your wraps with your preference of fabric and colors gives them personal expression and versatility.
Make a bold statement with vibrant patterns. Choose the luxurious feel of elegant silk or the practicality and comfort of cotton.
There’s a head wrap style that’s just right for you!


Each wrap tells a story, celebrates culture, and offers a way for you to express yourself, no matter the occasion.
Embrace the universal beauty of head wraps for daily or special occasions.
Don’t be afraid to try something new—mix and match different fabrics, play with various wrapping techniques, and find the styles that make you feel confident and empowered.
Share your favorite head wrap styles and experiences with others.
Whether through social media, with friends, or in your community, your creativity and style can inspire others to explore the rich tradition of head wraps.
Celebrate the beauty, heritage, and individuality that head wraps bring into our lives.


